Diagnostic testing should have both soil and root samples when possible.
If no roots are submitted, the assay may not accurately assess the role of nematodes.
- Collect samples for diagnostic nematode assay any time plants are actively growing and the soil is in good working condition. Soil should not be frozen, nor should it be excessively wet or dry.
- Submit separate samples from both the problem area and from a nearby area where growth is normal for comparison.
- Other agronomic tests should be used in conjunction with nematode testing since many problems have more than one cause.
- Submit soil samples to the Soil Testing Lab to determine plant-available nutrients and soil pH.
- Submit plant tissue samples to the Plant Analysis Lab for plant nutrient levels.
- Submit diseased plant specimens to the NCSU Plant Disease and Insect Clinic (PDIC) through your NCDA&CS regional agronomist or county Cooperative Extension agent.
- Boxed nematode samples must be protected from overheating and freezing. Do not place samples in direct sunlight, the trunk of a car or a freezer.
- You can collect samples for diagnostic nematode assay any time plants are actively growing and the soil is in good working condition. It should not be frozen, nor should it be excessively wet or dry.
- Submit separate samples from both the problem area as well as from a nearby area where growth is normal for comparison.
- Other agronomic tests should be used in conjunction with nematode testing since many problems have more than one cause.
- Submit soil samples to the Soil Testing Lab to determine plant-available nutrients and soil pH.
- Submit plant tissue samples to the Plant Analysis Lab for plant nutrient levels.
- Submit diseased plant specimens to the NCSU Plant Disease and Insect Clinic (PDIC) through your NCDA&CS regional agronomist or county Cooperative Extension agent.
- Boxed nematode samples must be protected from overheating and freezing. Do not place samples in direct sunlight, the trunk of a car or a freezer.
Materials Needed

- Soil probe or shovel
- Nematode-specific boxes and plastic bags provided by NCDA&CS.Use sample boxes, bags and information forms designed specifically for nematode assays. They are available from the NCDA&CS Agronomic Services Division office in Raleigh, your local Cooperative Extension office and many ag-chemical dealers.
Collecting Soil

- For each sample, collect at least 20 soil cores from the root zone (0–4 inches deep in no-till areas, 0–8 inches in conventional crops).
- Thoroughly mix the cores together in a plastic bucket.
- Use this mixture to fill the plastic bag that comes with the nematode assay sample box.
- Seal the bag tightly and place it inside the sample box.
- Print your name, address and sample ID in the spaces provided on the box. If you are using a Farm ID to group samples, be sure to also print the Farm ID on each sample box.
- If soils vary in the sampled area, take a separate sample from each soil type.
Collecting Roots

- Collect root samples from plants exhibiting moderate to severe symptoms but not from dead plants. In collecting the roots, remove the plant carefully from the soil with a shovel or spade; do not pull it from the ground.
- After carefully shaking off the adhering soil, collect some of the smallest fibrous roots.
- Include as many feeder roots with the soil as possible.
- Place the roots inside the plastic bag of previously collected soil.
- If the roots are too large, then place them in a separate plastic bag, and label the bag with the sample ID assigned to the nematode sample box.
Where to Sample
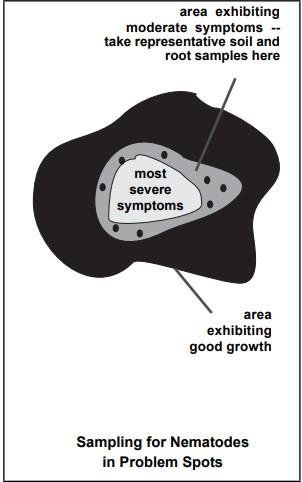
Problem areas: Soil samples for problem diagnosis should be collected from around the margin of the affected area, where plants are exhibiting moderate to severe symptoms. Samples should not be collected from the most severely affected area when these plants are dying or dead. If the field has more than one affected area, collect samples from several such areas.
Take soil from the root zone of plants that are affected but still alive. Never sample beneath dead plants.
Healthy areas: It is also best to take samples from a nearby area that is healthy so the results can be compared and proper recommendations given.
On This Page Jump Links
Off
This page was last modified on 07/15/2026